Create Edit View:
We have already created the Index view in the previous section. In this section, we will create the Edit view using a default scaffolding template as shown below. The user can update existing student data using the Edit view.
The Edit view will be rendered on the click of the Edit button in Index view. The following figure describes the complete set of editing steps.
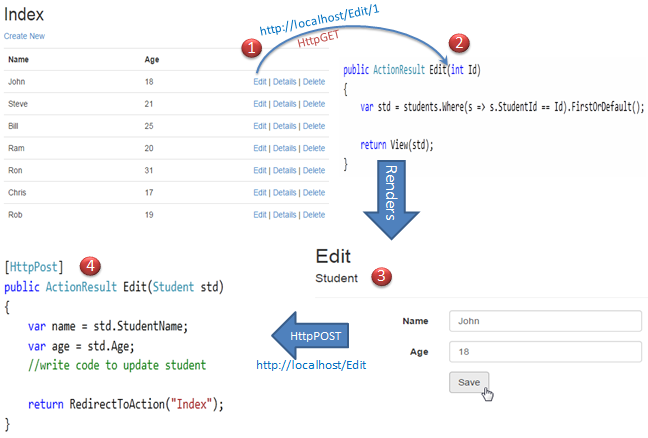
The above figure illustrates the following steps.
1. The user clicks on the Edit link in Index view which will send HttpGET request http://localhost/student/edit/{Id} with corresponding Id parameter in the query string. This request will be handled by HttpGET Edit action method.(by default action method handles HttpGET request if no attribute specified)
2. HttpGet Edit action method will fetch student data from the database, based on the supplied Id parameter and render the Edit view with that particular Student data.
3. The user can edit the data and click on the Save button in the Edit view. The Save button will send a HttpPOST request http://localhost/Student/Edit with the Form data collection.
4. The HttpPOST Edit action method in StudentController will finally update the data into the database and render an Index page with the refreshed data using the RedirectToAction method as a fourth step.
So this will be the complete process in order to edit the data using Edit view in ASP.NET MVC.
So let's start to implement above steps.
We will be using following Student model class for our Edit view.
public class Student
{
       public int StudentId { get; set; }

    [Display( Name="Name")]
       public string StudentName { get; set; }

       public int Age { get; set; }
}
Step: 1
We have already created an Index view in the previous section using a List scaffolding template which includes an Edit action link as shown below.

An Edit link sends HttpGet request to the Edit action method of StudentController with corresponding StudentId in the query string. For example, an Edit link with student John will append a StudentId=1 query string to the request url because John's StudentId is 1. Likewise all the Edit link will include a respective StudentId in the query string.
Step 2:
Now, create a HttpGET Edit action method in StudentController. The Index view shown above will send the StudentId parameter to the HttpGet Edit action method on the click of the Edit link.
The HttpGet Edit() action method must perform two tasks, first it should fetch the student information from the underlaying data source, whose StudentId matches with the StudentId in the query string. Second, it should render Edit view with the student information so that the user can update it.
So, the Edit() action method should have a StudentId parameter. MVC framework will automatically bind a query string to the parameters of an action method if the name is matches. Please make sure that parameter name matches with the query string.
using MVC_BasicTutorials.Models;

namespace MVC_BasicTutorials.Controllers
{
       public class StudentController : Controller
    {
       IList<Student> studentList = new List<Student>() {
       new Student(){ StudentId=1, StudentName="John", Age = 18 },
       new Student(){ StudentId=2, StudentName="Steve", Age = 21 },
       new Student(){ StudentId=3, StudentName="Bill", Age = 25 },
       new Student(){ StudentId=4, StudentName="Ram", Age = 20 },
       new Student(){ StudentId=5, StudentName="Ron", Age = 31 },
       new Student(){ StudentId=6, StudentName="Chris", Age = 17 },
       new Student(){ StudentId=7, StudentName="Rob", Age = 19 }
       };

       public ActionResult Edit(int StudentId)
        {
       //Get the student from studentList sample collection for demo purpose.
       //You can get the student from the database in the real application
       var std = studentList.Where(s => s.StudentId == StudentId).FirstOrDefault();

       return View(std);
        }
    }
}
As you can see in the above Edit method, we have used a LINQ query to get the Student from the sample studentList collection whose StudentId matches with supplied StudentId, and then we inject that Student object into View. In a real life application, you can get the student from the database instead of sample collection.
Now, if you click on the Edit link from Index view then you will get following error.
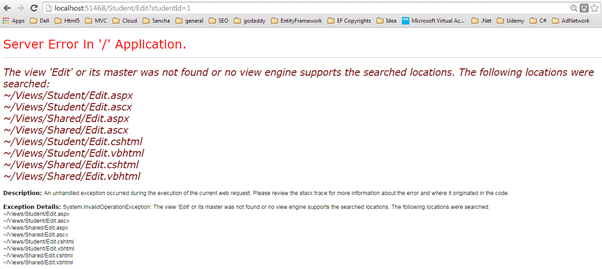
The above error occurred because we have not created an Edit view yet. By default, MVC framework will look for Edit.cshtml or Edit.vbhtml or Edit.aspx or Edit.ascx file in View -> Student or Shared folder.
Step 3:
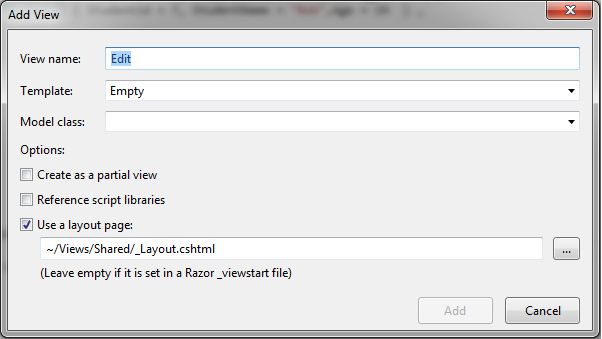
To create Edit view, right click inside Edit action method and click on Add View.. It will open Add View dialogue.
In the Add View dialogue, keep the view name as Edit. (You can change as per your requirement.)
Select Edit in the Template dropdown and also select Student for Model class as shown below.
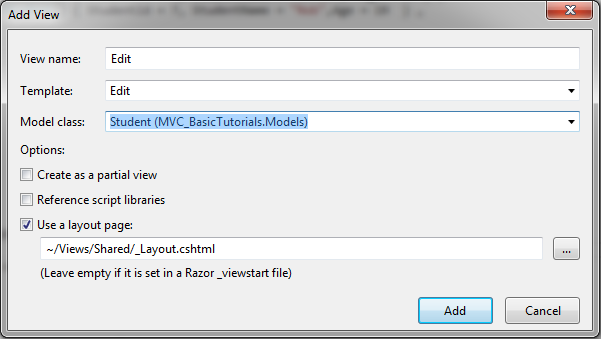
Now, click Add to generate Edit.cshtml view under View/Student folder as shown below.
@model MVC_BasicTutorials.Models.Student
@{
    ViewBag.Title = "Edit";
    Layout = "~/Views/Shared/_Layout.cshtml";
}

<h2>Edit</h2>

@using (Html.BeginForm())
{
       @Html.AntiForgeryToken()

       <div class="form-horizontal">
       <h4>Student</h4>
       <hr />
       @Html.ValidationSummary(true, "", new { @class = "text-danger" })
       @Html.HiddenFor(model => model.StudentId)

       <div class="form-group">
       @Html.LabelFor(model => model.StudentName, htmlAttributes: new { @class = "control-label col-md-2" })
       <div class="col-md-10">
       @Html.EditorFor(model => model.StudentName, new { htmlAttributes = new { @class = "form-control" } })
       @Html.ValidationMessageFor(model => model.StudentName, "", new { @class = "text-danger" })
       </div>
       </div>

       <div class="form-group">
       @Html.LabelFor(model => model.Age, htmlAttributes: new { @class = "control-label col-md-2" })
       <div class="col-md-10">
       @Html.EditorFor(model => model.Age, new { htmlAttributes = new { @class = "form-control" } })
       @Html.ValidationMessageFor(model => model.Age, "", new { @class = "text-danger"< })
       </div>
       </div>

       <div class="form-group">
       <div class="col-md-offset-2 col-md-10">
       <input type="submit" value="Save" class="btn btn-default" />
       </div>
       </div>
       </div>
}

<div>
       @Html.ActionLink("Back to List", "Index")
</div>
Please notice that Edit.cshtml includes HtmlHelper method @using (Html.BeginForm()) to create a html form element. Html.BeginForm sends a HttpPost request by default.
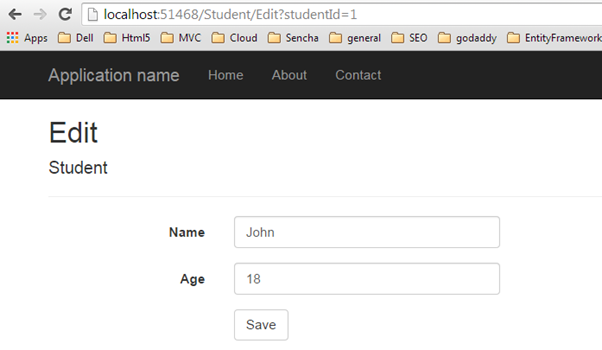
Now, click on the Edit link of any student in the Index view. Edit view will be display student information whose Edit link clicked, as shown below.
You can edit the Name or Age of Student and click on Save. Save method should send a HttpPOST request because the POST request sends form data as a part of the request, not in the querystring. So write a POST method as fourth step.
Step 4:
Now, write POST Edit action method to save the edited student as shown below.
[HttpPost]
public ActionResult Edit(Student std)
{
       //write code to update student

       return RedirectToAction("Index");
}
As you can see in the above code, the Edit() method requires a Student object as an input parameter. The Edit() view will automatically binds form's data collection to the student model parameter. Please visit Model Binding section for more information. Here, you can update the information to the database and redirect it to Index action. (we have not written code to update database here for demo purpose)
Now, clicking on the Save button in the Edit view will save the updated information and redirect it to the Index() action method.
In this way, you can provide edit functionality using a default scaffolding Edit template. However, you can also create an Edit view without using an Edit scaffolding template.
The following example demonstrates the StudentController class with all the action methods.
using MVC_BasicTutorials.Models;

namespace MVC_BasicTutorials.Controllers
{
       public class StudentController : Controller
    {
       IList<Student> studentList = new List<Student>() {
       new Student(){ StudentId=1, StudentName="John", Age = 18 },
       new Student(){ StudentId=2, StudentName="Steve", Age = 21 },
       new Student(){ StudentId=3, StudentName="Bill", Age = 25 },
       new Student(){ StudentId=4, StudentName="Ram", Age = 20 },
       new Student(){ StudentId=5, StudentName="Ron", Age = 31 },
       new Student(){ StudentId=6, StudentName="Chris", Age = 17 },
       new Student(){ StudentId=7, StudentName="Rob", Age = 19 }
       };
       // GET: Student
       public ActionResult Index()
        {
       return View(studentList);
        }

       public ActionResult Edit(int StudentId)
        {
       //Get the student from studentList sample collection for demo purpose.
       //You can get the student from the database in the real application
       var std = studentList.Where(s => s.StudentId == StudentId).FirstOrDefault();

       return View(std);
        }

        [HttpPost]
       public ActionResult Edit(Student std)
        {
       //write code to update student

       return RedirectToAction("Index");
        }
    }
}
Learn how to implement validations in the razor view in the next section.