View in ASP.NET MVC:
In this section, you will learn about the View in ASP.NET MVC framework.
View is a user interface. View displays data from the model to the user and also enables them to modify the data.
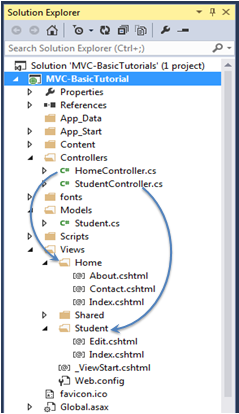
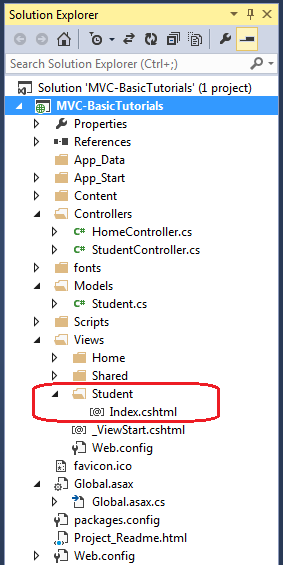
ASP.NET MVC views are stored in Views folder. Different action methods of a single controller class can render different views, so the Views folder contains a separate folder for each controller with the same name as controller, in order to accommodate multiple views. For example, views, which will be rendered from any of the action methods of HomeController, resides in Views > Home folder. In the same way, views which will be rendered from StudentController, will resides in Views > Student folder as shown below.
Razor view engine:
Microsoft introduced the Razor view engine and packaged with MVC 3. You can write a mix of html tags and server side code in razor view. Razor uses @ character for server side code instead of traditional <% %>. You can use C# or Visual Basic syntax to write server side code inside razor view. Razor view engine maximize the speed of writing code by minimizing the number of characters and keystrokes required when writing a view. Razor views files have .cshtml or vbhtml extension.
ASP.NET MVC supports following types of view files:
| View file extension | Description |
|---|---|
| .cshtml | C# Razor view. Supports C# with html tags. |
| .vbhtml | Visual Basic Razor view. Supports Visual Basic with html tags. |
| .aspx | ASP.Net web form |
| .ascx | ASP.NET web control |
Learn Razor syntax in the next section. Let's see how to create a new view using Visual Studio 2013 for Web with MVC 5.
Create New View:
We have already created StudentController and Student model in the previous section. Now, let's create a Student view and understand how to use model into view.
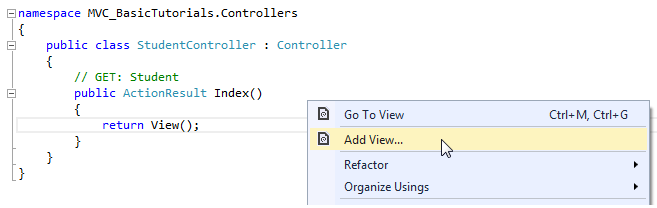
We will create a view, which will be rendered from Index method of StudentContoller. So, open a StudentController class -> right click inside Index method -> click Add View..
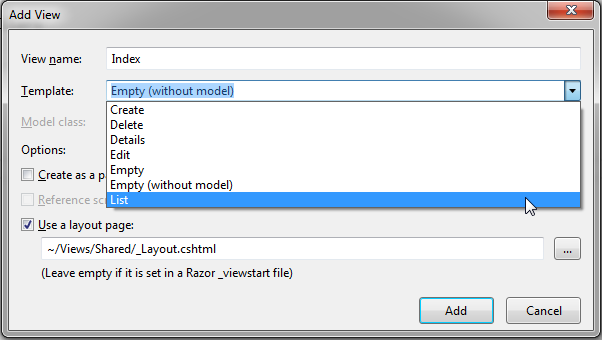
In the Add View dialogue box, keep the view name as Index. It's good practice to keep the view name the same as the action method name so that you don't have to specify view name explicitly in the action method while returning the view.
Select the scaffolding template. Template dropdown will show default templates available for Create, Delete, Details, Edit, List or Empty view. Select "List" template because we want to show list of students in the view.
Now, select Student from the Model class dropdrown. Model class dropdown automatically displays the name of all the classes in the Model folder. We have already created Student Model class in the previous section, so it would be included in the dropdown.
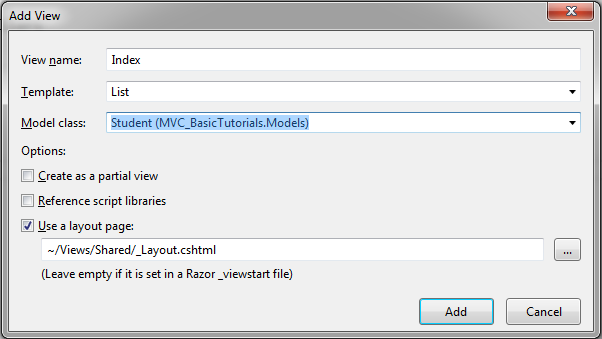
Check "Use a layout page" checkbox and select _Layout.cshtml page for this view and then click Add button. We will see later what is layout page but for now think it like a master page in MVC.
This will create Index view under View -> Student folder as shown below:
The following code snippet shows an Index.cshtml created above.
@model IEnumerable<MVC_BasicTutorials.Models.Student>

@{
    ViewBag.Title = "Index";
    Layout = "~/Views/Shared/_Layout.cshtml";
}

<h2>Index</h2>

<p>
    @Html.ActionLink("Create New", "Create")
</p>
<table class="table">
    <tr>
        <th>
            @Html.DisplayNameFor(model => model.StudentName)
        </th>
        <th>
            @Html.DisplayNameFor(model => model.Age)
        </th>
        <th></th>
    </tr>

@foreach (var item in Model) {
    <tr>
        <td>
            @Html.DisplayFor(modelItem => item.StudentName)
        </td>
        <td>
            @Html.DisplayFor(modelItem => item.Age)
        </td>
        <td>
            @Html.ActionLink("Edit", "Edit", new { id=item.StudentId }) |
            @Html.ActionLink("Details", "Details", new { id=item.StudentId  }) |
            @Html.ActionLink("Delete", "Delete", new { id = item.StudentId })
        </td>
    </tr>
}

</table>
As you can see in the above Index view, it contains both Html and razor codes. Inline razor expression starts with @ symbol. @Html is a helper class to generate html controls. You will learn razor syntax and html helpers in the coming sections.

The above Index view would look like below.


Points to Remember :
- View is a User Interface which displays data and handles user interaction.
- Views folder contains separate folder for each controller.
- ASP.NET MVC supports Razor view engine in addition to traditional .aspx engine.
- Razor view files has .cshtml or .vbhtml extension.
Learn how to integrate model, view and controller in the next section.